MezeLounge Server Essentials
Document covering essential game-related things, and answering FAQs.
Game Installation
This video guide will have everything you need to install MHFZ.
Frequently Asked Questions
Q. How do I register?
A. You are able to create a character by simply inputting an Account ID (of your choosing) and a password.
Q. I’ve created a character, but it shows me a profile that is HR7?
A. The “Hunter Application Possible” HR7 profile it shows is only a placeholder, you will still be HR1 when you click “Start Game”
Q. How do I get a pre-made GR1 Character?
A. The only way to get a pre-made GR1 character is if you have proof of owning a previous G-Rank character (Image, video) typically sent to Sera or Dixdros.
Q. I get Error Code 10054 when I play the game, why does that happen?
A. Error Code 10054 usually indicates a problem with one’s own internet connection, in rare cases it can be the server itself.
Q. My launcher is stuck, it won’t finish updating / white screen error message
A. This happens when not properly setting up the game, you must allow MHFZ to bypass your firewall / antivirus for it to work properly.
Controller Configurations
This section of the guide is particularly useful to answer one of the most asked questions in the server, how to change the camera settings (In this case, general camera + gunner aim)
Start Menu -> Input Options -> Scroll down to “Camera Pan Speed” and change it to “Smooth 2”
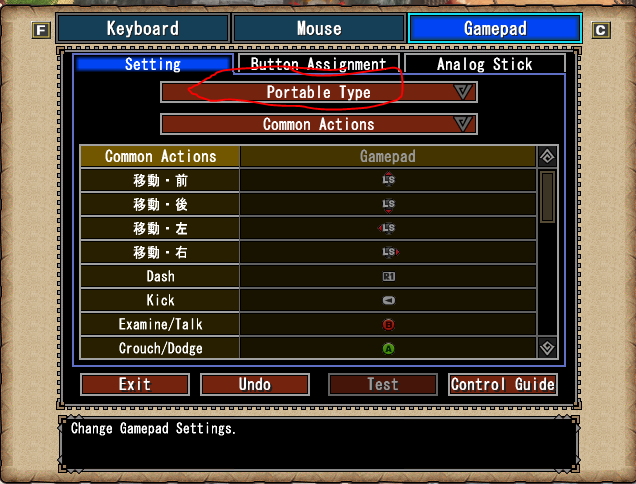
The game by default does not have the camera movement set for right joystick, but that can be changed in the same Input Options menu, Input Options -> Key Settings -> Highlight Gamepad, and change the circled options to “Portable Type” exit, and confirm the setting.

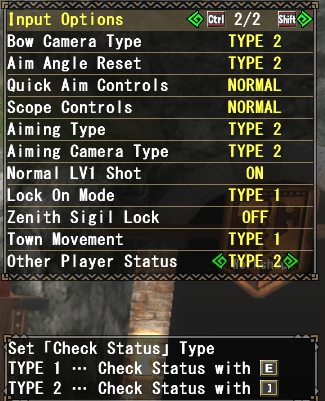
This is page 2 of Input Settings, note that Aiming Type is set to Type 2, as well as Aiming Camera Type.
Depending on the controller being used, you may run into trigger issues that most commonly happen for Xbox, or generic USB controllers.
- This pastebin will have further instructions on how to set up PS4 / PS5 / Switch / Xbox, please check the pastebin if you have further controller issues.
- Most common issues are fixed by simply running MHFZ through your Steam Library.
- The Pastebin above will touch on the required Xinput+ that Xbox One X Controllers tend to need.
Useful Links
- Ferias - Incredibly useful database for Monster Hunter Frontier, includes information on how to get certain materials, data on armor, weapons, etc.
- MezeLounge MHF-Z Achievements - Website archiving completed challenge runs / weapon guides for said runs.
- Mertna's MHFZ-Skills - Lists every skill in the game, HH notes, etc.
- SephVII - In-depth guides for every weapon in the game.
- Set Searcher - Useful tool that’ll help you choose the skills you’d want in a set.
- Misc Spreadsheet - Spreadsheet detailing My Mission, Hunter Navi, Halk skills and Diva questline. All of these are explained in further detail throughout the guide.
- Poogie Guide - A more in-depth guide regarding the Poogie.
 MHFZ-Overlay - Allows players to keep track of in-game stats such as Monster HP, Status Info, etc.
- - Tower Weapon Simulator used to simulate stats when upgrading Tower / Tenrou weapons (mostly useful for late / end game).
- - Wycademy MHF-Z Damage Calculator/Simulator
Rough Progression "Guide"
Prior to G Rank, the progression in Frontier works the same as in other MH games – do Key quests until you unlock an Urgent quest, do the Urgent to rank up. Unlike most mainline games, Frontier actually shows you which quests are the Key quests for a rank. Key quests are marked with an orange diamond and are also marked as clear when you beat them, unlike other quests in the game.

As you rank up, you’ll unlock more key features and in-game systems. The main unlocks for each rank are:
| Low/High Rank | Unlocks |
|---|---|
| HR2 | Partner, Partnya, Halk, Taloncharm, Caravan Gem / Skills |
| HR3 | Transcendence, Guild |
| HR4 | Poogie |
| HR5 | Hardcore Monsters, Styles, My Mission (In the house menu), Exotic Monsters It is important to note the sudden change in difficulty when jumping from HR5 to HR6, it is highly recommended to ask someone for help, if you are unable to solo the Supremacy Monsters. |
| HR6 | My Mission (In the quest menu, expanded further down in the guide.) |
| G Rank | Unlocks |
|---|---|
| GR1 | Switch Axe & Tonfa, Extreme Style, Magnet Spike questline |
| GR50 | Poogie GR License (Skill Cuffs) |
| GR100 | G Exotics |
| GR2 / 4 / 6 / 800 | Zenith Rank 1 / 2 / 3 / 4 Monsters |
| GR999 | Unlimited Monsters |
Please make sure to check out the Event Quest tab, as a lot of those are quests that give you free decos!
One in particular, will give you a very strong weapon early on in the game.
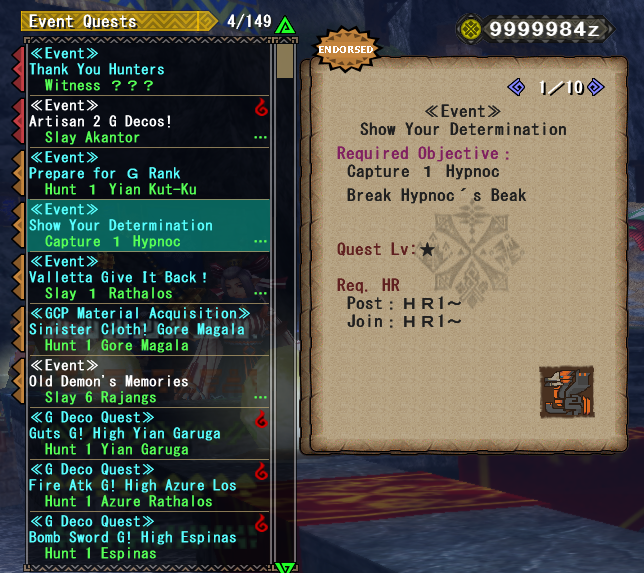
This quest will allow you to make the “Resolute” weapons.
NPC Hunters
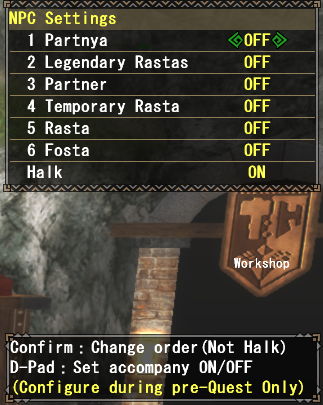
Frontier has various NPC hunters that can be used to help you on hunts. These NPCs vary in usefulness, availability and utility. Below is an image of the “NPC Settings” tab, which can be used to enable or disable each NPC type, as well as controlling in which order NPCs are prioritized when starting a hunt. Aside from the Halk, which is completely free to bring, each NPC takes up one space in your quest. Just like mainline games, quests can only have up to 4 players. The different NPCs are elaborated on further later in the guide.
Taloncharm
The Hunter’s Taloncharm is the result of combining both Power Taloncharm, and Armour Taloncharm.
Buy Powercharm(x2) & Armorcharm(x2) from the general store. In GCP Exchange, look for Lao Shan Claw (x2)
Taloncharm Crafting Process

Important note - The charms DO NOT stack. The Hunter’s Taloncharm has the effects of all the others, so you only need to have that in your inventory.
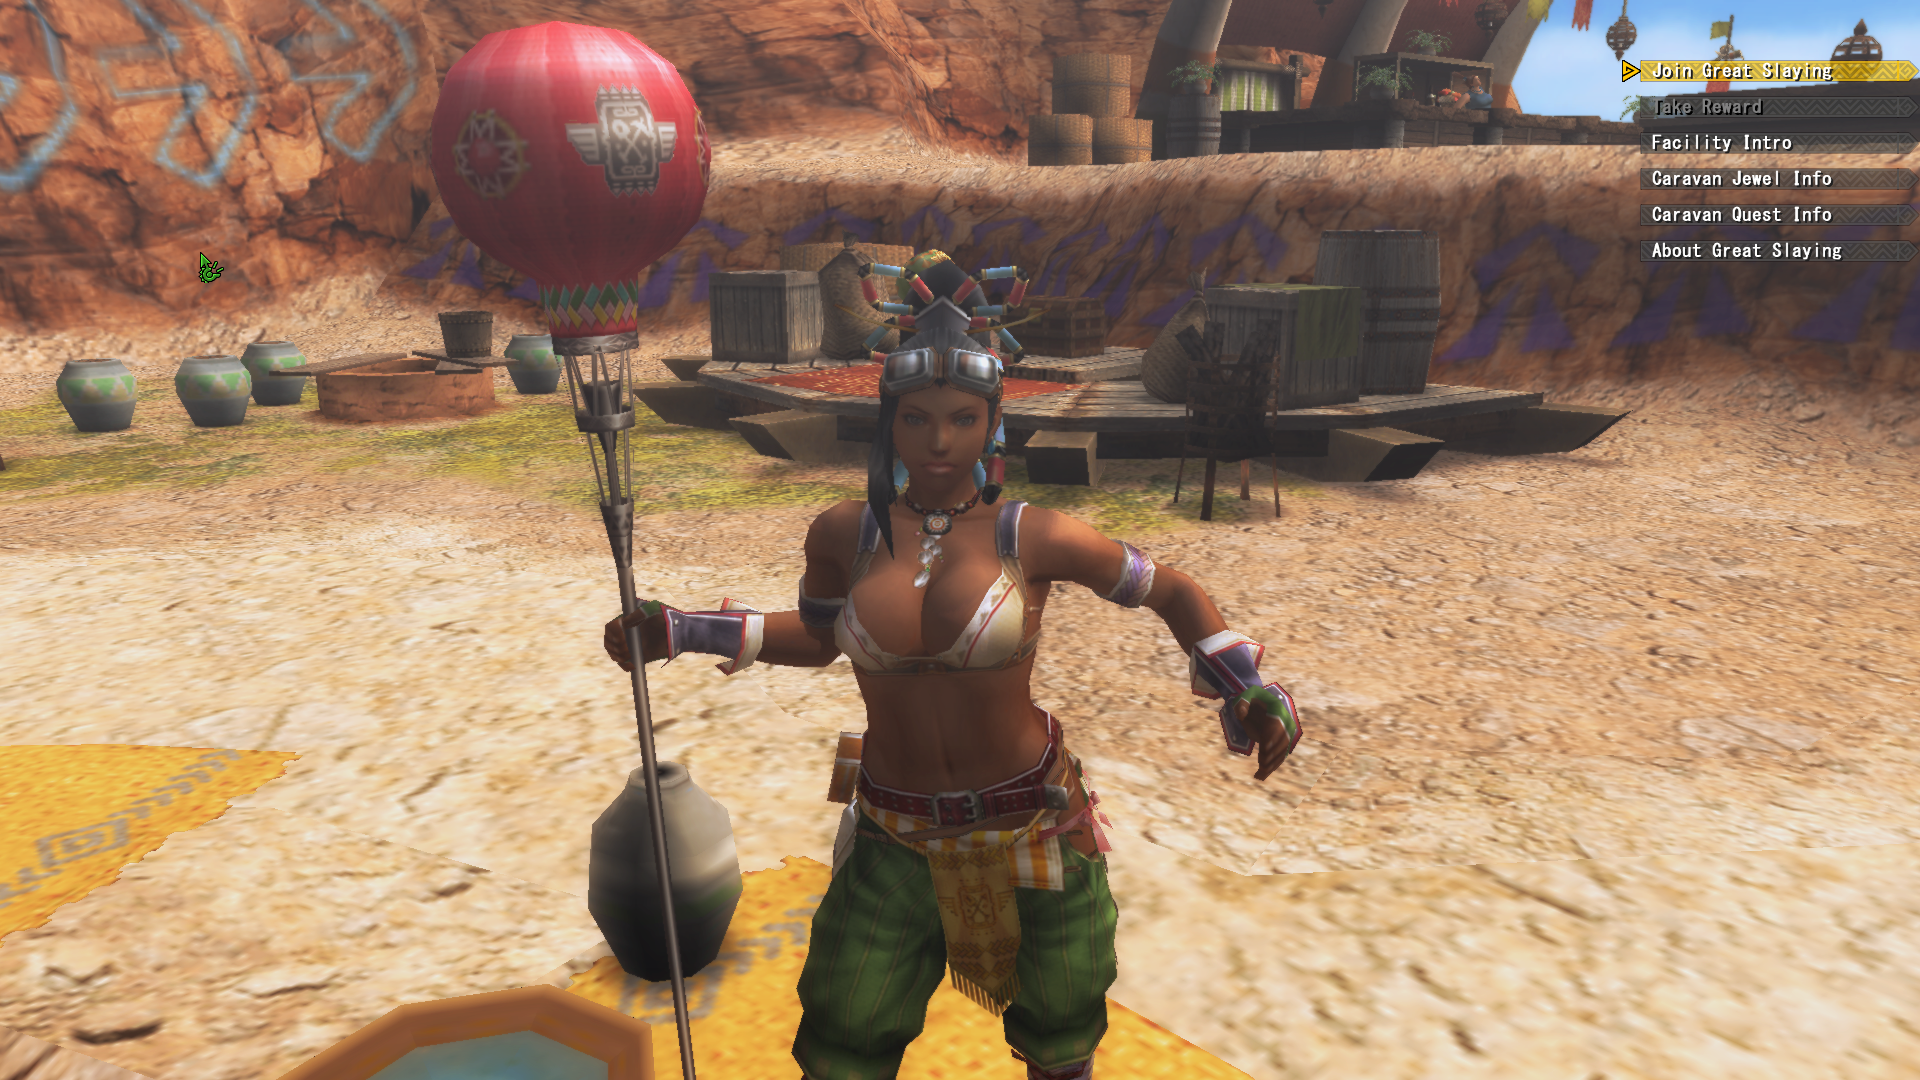
Caravan
When you reach HR2, you have access to the Caravan Gem, and Caravan Skills. Through the Move Menu, go to Pallone Caravan and interact with the “Boss” NPC to unlock the Gem, which appears as a colored circle next to your name. This is typically something you grind out during G-Rank, but it is best to get it ASAP as it is leveled up passively by doing quests.
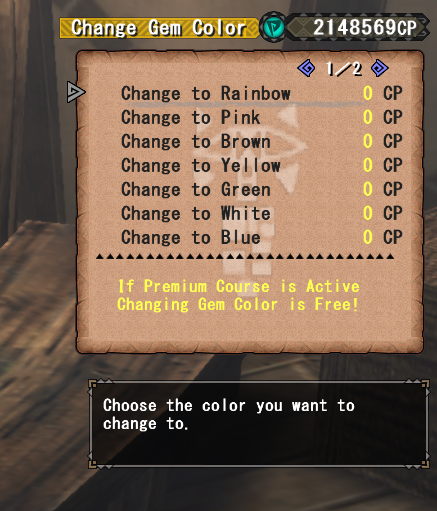
It is highly recommended that you change the Gem’s color to Rainbow, since it will accumulate every color required at the same time during your hunts, and it will speed up the process of leveling the Gem. This can be done at the building across the bridge. The color changes on its own once a day, so make sure your Gem is Rainbow before doing quests. Especially if you plan to play for an extended period. While this can be annoying, playing with Rainbow Gem from the start will cut down on a lot of color grinding throughout the game.
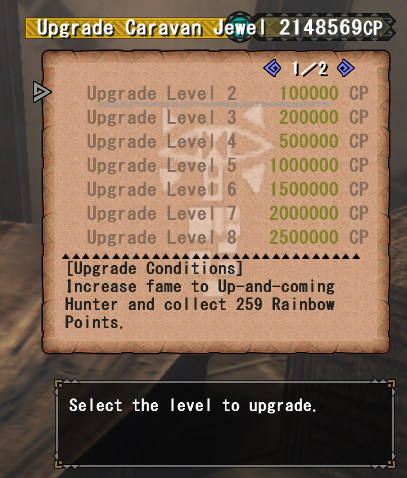
Once you’ve accumulated enough Gem colors, you can rank the Gem up using Caravan Points. When you qualify for the upgrade you will no longer be collecting colors, so you should ideally upgrade the Gem level as soon as you reach the cap (e.g. 259 of each color to go from level 1 to level 2).
The importance of the Caravan Gem, however, is that the higher the level, the more skills it will unlock, some of which are incredibly useful, and must haves. Caravan Skills can be changed in your equipment box.
Transcendence
Upon reaching HR3, talking to the Guild Master will unlock a buff that will appear in your item bar. Similar to Wystones from MH4U, Transcendence has a charging time and an activation time. Transcendence will charge as time passes during your quests, gradually filling up until it’s ready for use, having the icon change from a silver color to gold. While using and activating the “Transcended” state, the icon will slowly revert back to silver.
During this state, attacks will gain a special effect depending on the element of your weapon, and the monster’s elemental resistance. If you manage to hit the monster a sufficient amount of times, the Transcend Icon will change into a knife. Sheathing your weapon and activating the “Hexaflash Dance” (Hexa), previously called “Arcane Pulse”, the hunter will dash at the monster and activate the corresponding effect depending on the weapon element.

Transcendence can be upgraded for longer duration, stronger effects, etc. This will be touched up in the Hunter’s Festival section.

In-depth details are available via the Hexaflash Data page.
Guild / Clan
In game, you will find the Guild Reception NPC on the right side of the hub (on login) there you are able to select the option “Join Clan” where you can request to join any guild.

Joining a guild is incredibly important when playing MHFZ. A guild has many big benefits such as Guild Food, Guild Poogies, and an event that will be expanded on later called the Hunters Festival.
Guild Food when using the proper recipe, can activate skills separate from your Set skills, lasting a total of 90 minutes. Recipes for the skills given by Guild Food can be found here.
NOTE: Ingredients can be bought at the Grocery store, as well as Guild Shop.
Guild Poogies are special because depending on the one you feed, you will get a buff that can be very helpful. The item required to feed this is called Poogie Cracker, which can also be found at the Guild Shop. Sometimes they must be fed multiple times in order to get the skill. Each effect / outfit the Poogie can have can be found here. The skill lasts until you log out, or activate another Poogie skill.
Pets (Halk & Poogie)
Unlocked at HR2, the Halk is a flying Wyvern NPC that can accompany you during your quests. Halks can be quite helpful once invested in, getting multiple useful abilities such as showing the entire map without needing one, occasionally revealing the locations of large monsters, and being able to heal you from various status ailments. Halks are elaborated on further in the “Types of NPC Hunters'' section.
You also unlock the ability to get a Poogie at HR4. Getting a Poogie is simple, but if you do it wrong you can potentially lock yourself out of getting a Poogie, and its benefits, until you use the “Get Points'' option with the Tore Manager enough times. The full Poogie guide can be found in the useful links above.
Hunter’s Festival
The Hunter’s Festival is an event that takes place monthly, divided into three phases:
Phase 1 is the sign-up week, Guild Leaders have the opportunity to sign up their Guilds for the Hunter’s Festival, being randomly assigned into one of 2 teams, blue and red.
Phase 2 is the soul gathering week, during this phase hunters will collect souls after finishing quests, and deliver them to the Hunter’s Festival NPC. By collecting enough souls you can qualify for certain milestone rewards. There are rewards for both individual contribution and total guild souls. You can also bring “Soul Gems” with you on quests to get 20, 40, or 80 additional souls depending on the Gem. Only one can be used per quest, and smaller Gems are used first.
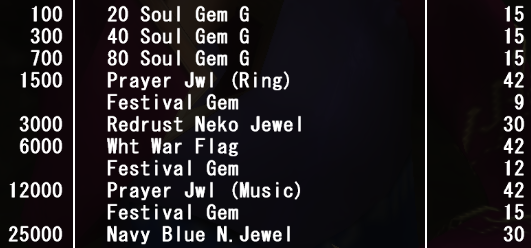
Phase 3 is the reward phase, this is when the points accumulated by both the Red and Blue teams are compared, although winning doesn’t actually matter, as everyone gets the rewards. During the reward phase, the Festi Exchange opens. The exchange offers many items including food ingredients, gathering materials, decoration jewels, and a range of common / rare monster materials. It is also one of the only sources of Black Ravi materials in the game.
The main point of Hunter’s Festival however, is the ability to be able to craft very powerful Festival decos, which a lot of armor set builds use.
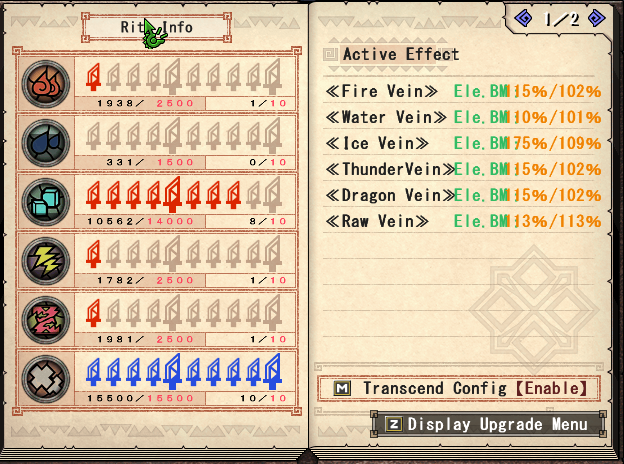
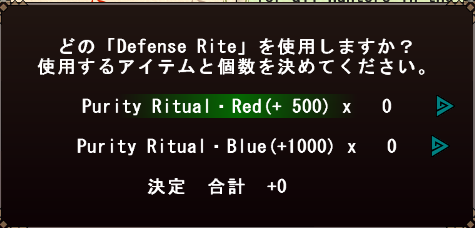
With some of these milestone rewards, come the material needed to upgrade the effects of Transcend. Purity Ritual - Red/Blue are what you will receive through the festival, so long as you are meeting the milestones during the soul gathering phase.(Personal rewards, not clan rewards, those give different materials) The Transcend menu can be accessed through the Pause menu.
Personal rewards acquired by meeting milestone:

Clan rewards acquired by meeting milestone:
Hardcore & Unlimited Monsters
Hardcore (HC) and Unlimited (UL) Monsters are both somewhat similar. HCs are unlocked upon reaching HR5, and allow you to refight monsters you already know, except with some new moves and higher stats. ULs only unlock once you reach GR999 and serve as HC monsters with significantly increased stats, giving you the opportunity to actually engage with monsters who would otherwise die incredibly quickly with endgame equipment.
In addition to affecting the fights themselves, HC monsters award twice the GR and GSR points of their normal counterparts. HC and UL monsters also award players with “Soul”, “Ribbon” and “Merit” items for the weapon they’re using (items needed to craft certain equipment).
Styles
When you reach HR5, you unlock 2 new styles, Heaven and Storm Style respectively. Unlocked by talking to the guild master, these styles have different movesets than the Earth style you start with. To best try out these styles and their differences, you can test them out by interacting with your bed and selecting “Practice Weapons in Dream”. Once you reach G Rank, you’ll unlock a fourth style – Extreme Style. This is generally the best style in almost all cases, as it usually has everything the other styles have and then some.
My Mission
As noted earlier, there are two types of “My Mission”: one is an area in the move menu for your house, the other is the set of My Missions listed in the “Misc Spreadsheet” link. These are two separate systems, and should not be confused. The important type of My Mission is the one accessed through the quest menu (progress is shown in the SR Status page. These quests let you upgrade various passive effects for your hunter – most notably, your raw damage cap. With no missions done, your maximum true raw attack is 800. Once you finish all 250 of the missions, your cap has drastically increased to 8000 (each “Attack Ceiling” mission increases your cap by 40 true raw). The other My Mission is only relevant for one Longplay task in the Hunter Navi.
Exotic Monsters
Exotics are mainline monsters from games released after Frontier. They are significantly stronger versions of their mainline counterparts, and their equipment reflects this. Each Exotic equipment piece gives a full free armor skill, in addition to the regular points toward skills. All armor pieces from one Exotic have the same free skill, and stacking them does not give any added benefit. This means the best way to use Exotic pieces is to mix them into another set.
Below is a list of all the free skills granted by Exotic equipment.
| Monster | Free Skill |
|---|---|
| All Weapons | Speed Eating |
| Amatsu | Water Attack (Large) |
| Barioth | Ice Attack (Large) |
| Brachydios | Bomber |
| Deviljho | Starving Wolf +2 |
| Gore Magala | Focus +2 |
| Nargacuga | Evasion +2 |
| Seregios | Critical Eye +5 |
| Shagaru Magala | Status Immunity (Myriad) |
| Stygian Zinogre | Dragon Attack (Large) |
| Uragaan (Blademaster) | Guard +2 |
| Uragaan (Gunner) | Ammo Combiner |
| Zinogre | Thunder Attack (Large) |
G-Rank Weapons
At GR1, you unlock the ability to use Switch Axe and Tonfa. Tonfa is a completely new weapon for Frontier, whereas Switch Axe is similar to its main series counterpart, but with enough Frontier flair to set it apart.
You can also unlock a 3rd new weapon, Magnet Spike, through a short questline. The process for unlocking MS is detailed below.
Magnet Spikes
Basics
Magnet Spikes are a unique weapon with two modes that can be morphed between: Cutting and Impact modes. These modes deal the exact type of damage they are named for and use those specific hitboxes.
Unlocking Magnet Spike
To unlock Magnet Spikes, you must complete a short storyline that involves several solo-only quests. These quests culminate in acquiring materials for a Prototype Magnet Spike for both yourself and your partner. Although these quests are G Rank, they aren't particularly difficult. You can likely finish them with the first G Rank set you get for free if completed in a timely manner.
Unlocking Process
- Talk to the smithy and blatantly ignore what he's saying.
- Head into the legendary bar and talk to the new NPC, Graham.
- Head out to the entrance and talk to the cat you’ve ignored 800 times.
- Go back in and talk to Graham and do the G Rank Gougarfs in the top section.
- Go talk to Graham and then the combiner in the town square.
- Go and hunt the G Rank Rebidiora in the same section as the Gougarfs.
- After the hunt, head back and talk to Graham, the Smith, Graham again, and then the Road NPC.
- Post the new G Rank Rukodiora in the topmost section and murder it to death.
- Talk to Graham after returning and then the Smith.
- You’ve now unlocked Magnet Spikes and have the materials for a free Prototype.
Magnet Spike Stats
Magnet Spikes have no non-standard elements compared to standard weapons; they do not have phials, nor do they have length. Their attack multiplier is 5.4, meaning you divide by 5.4 and round up to get actual true raw.
Zenith Monsters
At GR200, GR400, GR600, and GR800 you unlock Z1, Z2, Z3, and Z4 Zenith quests respectively. Zeniths are particularly strong variants of monsters. Each Zenith has one part that’s powered up compared to their normal version. For example, Zenith Rathalos has his wings powered up. Zeniths also have powered up Roars, Wind, and/or Tremors. Breaking a Zenith’s Z part usually results in them being nerfed in some way. For example, breaking Zenith Rathalos’ wings prevents him from using Z Wind, and it removes his fire aura.
In addition to this, most Zeniths have a powered up Elemental Blight or Status. The Z Blights can be negated by having at least 55 resistance in that element. The most important Z Blights to cover are Fire, then Thunder. The Z Blight and status effects are as follows:
| Blight | Description |
|---|---|
| Z Fire | Acts similar to normal Fireblight, except it also rapidly reduces your maximum HP. You can cure Z Fireblight by rolling. (Severity of Fireblight may vary depending on Zenith level) |
| Z Water | Severely reduces your stamina regeneration. Taking a Dash Juice while Blighted still gives you infinite stamina, but any stamina you miss when taking the juice will still regenerate slowly. |
| Z Thunder | Does nothing on its own, however, if you get hit by another thunder move while blighted, you will go into cardiac arrest. If another player does not revive you within a short time limit, you instantly die. NPCs are unable to revive you. You can cure Z Thunderblight by rolling. |
| Z Ice | Gradually reduces your stamina. Once your stamina runs out, you get frozen. Z Iceblight can be cured by rapidly rotating the left stick (or button mashing). You can also circle the stick to break out faster once frozen. |
| Z Dragon | Prevents you from healing. It prevents all sources of healing, including Vampirism. Using healing items will instead play a special animation and damage you. Even if you get the special animation, Wide-Area healing will heal your teammates if they’re not blighted. The same rules apply to special sources of healing, like Lance’s guard mechanic. You can cure Z Dragonblight by rolling 13 times with your weapon sheathed. Nullberry will also cure Dragonblight. |
| Status | Description |
|---|---|
| Z Poison | Just a more severe version of normal Poison, but it cannot be cured using Antidotes. Z Poison can only be cured using Anti-Venoms, dropped by the monsters who inflict Z Poison. (Severity of Poison may vary depending on Zenith level) |
| Z Paralysis | Paralyzes you like normal, except Z Para will kick in multiple times after you get back up. Each time it activates, it’ll interrupt whatever you’re doing. The only way to cure Z Para is to wait for it to wear off. |
| Z Sleep | Like the others, is a stronger version of normal Sleep. You will instantly fall asleep, so you cannot use Energy Drinks to cure it. You need to be hit by a teammate to wake up. Unlike Z Thunder, however, NPCs can save you from Z Sleep. The monsters who inflict Z Sleep also have very dangerous moves to punish falling asleep, however. |
The elemental blights can all also be cured by using a Nullberry.
Types of NPC Hunters
There are several types of NPC hunters available in Monster Hunter Frontier, each with its own strengths and abilities. Below are the main types:
- Partner: Your main NPC companion, available from HR2. Partners can be customized with various equipment and skills to suit different playstyles.
- Partnya: Similar to Partners but have different equipment and skill options. They can also be customized extensively.
- Halk: A flying Wyvern NPC that provides various support abilities like healing and revealing monster locations.
- Poogie: A small pig companion that can provide various buffs depending on its outfit and the food it’s fed.
The most important NPC hunters in Frontier are your Partner, Partnya, and Halk. The others – Legendary Rasta, Rasta, Fosta, and Temporary Rasta – have their uses, but are generally not worth using. Legendary Rasta requires you to contract the Rasta you want and then bring a Legendary Rasta Ticket with you on a hunt. Fosta are free to bring, but it’s random which weapon they’ll use. As such, their contribution will vary a lot between hunts. Rasta are NPCs you receive from other players, though this currently does not work properly in the server. Temporary Rasta can be contracted in the Rasta Bar and have to be contracted again between quests. These are generally more trouble than they’re worth. If you want additional slot fillers, use Fosta.

Moving on to the main three, the Halk is the simplest. Halks are completely free to bring on hunts as they do not take up a slot in your party. Halks can be fed monster materials to gain points toward elements and statuses, and they can be equipped with up to three skills (listed in the Misc Spreadsheet). The third skill slot is unlocked at GR150. Halks can only have one element, and one status, and the combination of the two determines how your Halk will look. You can find, train, and customize your Halk in the “My Support” area in your house’s move menu. The Halk skills are equipable through the Halk Instructor’s “Skill Book Settings” menu. New skills are learned by picking up the glowing item your Halk sometimes drops at the end of quests, though you can get duplicate skills.

Also found within the My Support area are Frontier’s Felyne companions: Partnya. The Partnya’s main strength in Frontier is their ability to support just by existing. Even without any upgrades to their equipment, Partnya double the part break rewards from quests – if you need an item from a wing break, you’ll get two chances to obtain the item if you bring your cat. In addition to this, Partnya have additional inventory slots you can access mid-hunt. This is particularly useful for Gunners, since the Partnya pouch essentially doubles your ammo capacity without needing to craft anything. As your cat levels up their Partner Rank, you unlock more item slots in their pouch (1 slot every 100 PR, maxing out at 5 slots at PR400). The last 5 slots are only available through the Assist Course, which is unavailable in the MezeLounge server. You can also give your Partnya armor skills for useful support skills like Encourage and Assist through the treasure cat in My Tore’s Felyne Square, but this is outside the scope of the guide.
Finally we have your Partner. Like Legendary Rasta, your Partner can become very powerful. Unlike Legendary Rasta, however, getting a truly powerful Partner requires a lot of investment. Your Partner ranks up alongside you as you take them on quests and can use all the same weapon types as you can. Partners can change equipment, just like the player, though their armor functions quite differently to the player. Partners have different “tiers” of armor, and defense values remain the same within tiers. Z1 armor is sufficient to maximize your Partner’s defense. Partners also don’t gain armor skills the same way players do. For your Partner, armor pieces do not matter. All their skills are unlocked using GCP, through its own menu by talking to the partner. You will, however, need a lot of both GCP and hunts in order to fully max out your partner.
Hunter’s Navi
The Hunter’s Navi is an in-game guide of sorts. It has several tasks you can complete. Completing a task rewards you with various items. The “Misc Spreadsheet” contains a list of all the Navi tasks in the game. The descriptions on some of them are outdated, but most of the tasks are fairly self-explanatory.


The most consistently problematic task is the 2nd task in the GR2 set. To complete this task, you need to craft an “Orb Weapon”. These are the weapons crafted from one of four “Orb” items obtained through Gear Acquisition quests. There are, however, some Orb weapons that do not count for the task. You need a weapon from the “Blue Orb” (Anti-Teostra Weaponry), “White Orb” (Anti-Voljang Weaponry), “Black Orb” (Anti-Chameleos Weaponry), or “Yellow Orb” (Anti-Kushala Daora Weaponry). The “Peach”, “Green”, and “Purple Orb” weapons DO NOT work.
Endgame – Hunter’s Road
Hunter’s Road is one of the endgame activities in Monster Hunter Frontier. It involves tackling a series of increasingly difficult monsters, each providing better rewards. The goal is to progress as far as possible to earn valuable materials and bragging rights.
The Hunter’s Road is what most people would consider the biggest part of MezeLounge’s endgame content. “Road” is a type of quest where you hunt 1 monster per floor continuously, with the difficulty increasing the higher the floor you are. During Road, you are given 2 monster options every floor, more often than not (unless going for high points) the picks are highly dependent on survivability. As you go deeper into Road, with time you will know what picks are better for the team composition, what monsters are easier, which are too risky, etc. Every 10th floor, there is the option to fight a regular monster or a White Fatalis. W.Fatalis will net you a big amount of points, so learning how to deal with his fight is very important as a new player.
Hunting Road ends up being a necessity, as set building during the endgame generally requires you to have Road Points, which are gained by accumulating the Road Points you get per run.
During Roads you will also sometimes get a floor with several Shakalaka. These floors give Guild Medals in addition to RdP. The medals are primarily used to get more Soul Gems for Festi, or for getting additional gestures.
Hunting Road Skills
During Hunter’s Road, players can unlock and use special skills that are only available in this mode. These skills provide various benefits, such as increased damage, better defense, and unique abilities that help in taking down the toughest monsters.
Under “Status”, you will find the “Road Status” menu, showing you all Road specific skills that you are able to equip in order to optimize your Road runs.

Base Cost limit is 100, this can be increased to 130 using Cost Books. The books can be bought from Road Shop for 10 RdP each. You need 30 books to max the Cost limit.
The purple road skills have no impact on road quests. They are only used for Duremudira and Arrogant Duremudira quests. All these skills are free to equip, however, so you can always keep them active without affecting the rest of your road skills.
Skills recommendations
Almost always active:
- Revival Sage
- All Res Lv2 (or 3)
Active for more points and guild medals:
- Rd P Up Lv3
- Bonus Encounter
Leftover cost:
- Defense
Other considerations:
- Advancement Guru Lv3 (usually run for high floor runs, not something typically used for point gain)
- Attack Lv5 (Also ran for max damage)
Advancement Guru and Attack typically replace Rd P Up, Bonus Encounter and/or Revival Sage for max damage roads.
Credits
Special thanks to:
Blaze, Ninjar, & ZeroArcadia for gathering the content, and forming the structure of the guide.
ADarkRaccoon for the "How To Install MHFZ (MezeLounge Server) - Monster Hunter Frontier Z" Guide.
Mertnya for hosting various resources such as the Guild Food Skills Table, and Poogie Skills Table.
Doriel for hosting the MHF-Z Overlay, Wycademy Damage Calculator + Wycademy Tower Weapon Simulator, and for providing the Taloncharm craft-path image.